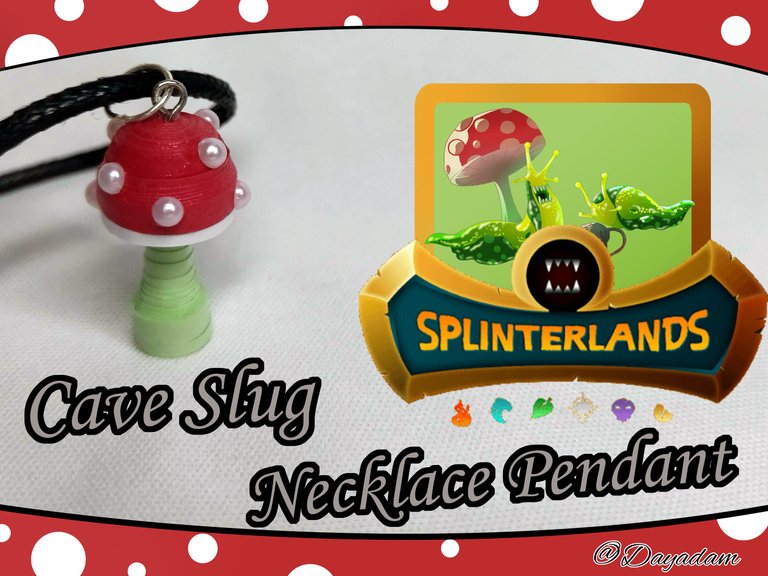
Cave Slug // Necklace Pendant in 3D Quilling Technique [Eng-Esp]
Hello everyone... ✨
Hello to my dear Hivers and the dear community of artists Jewelry, as always very pleased and excited to be here again, showing you my work made with love and especially for you...
Greetings to the Splinterlands community, and everyone who lives there, I'm here to join the Splinterlands Social Media Challenge!
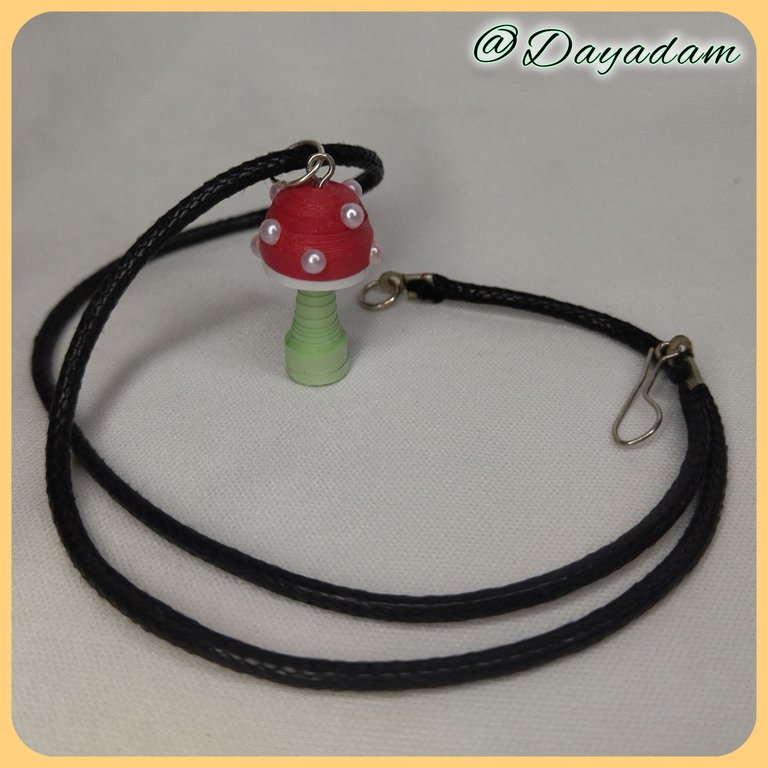
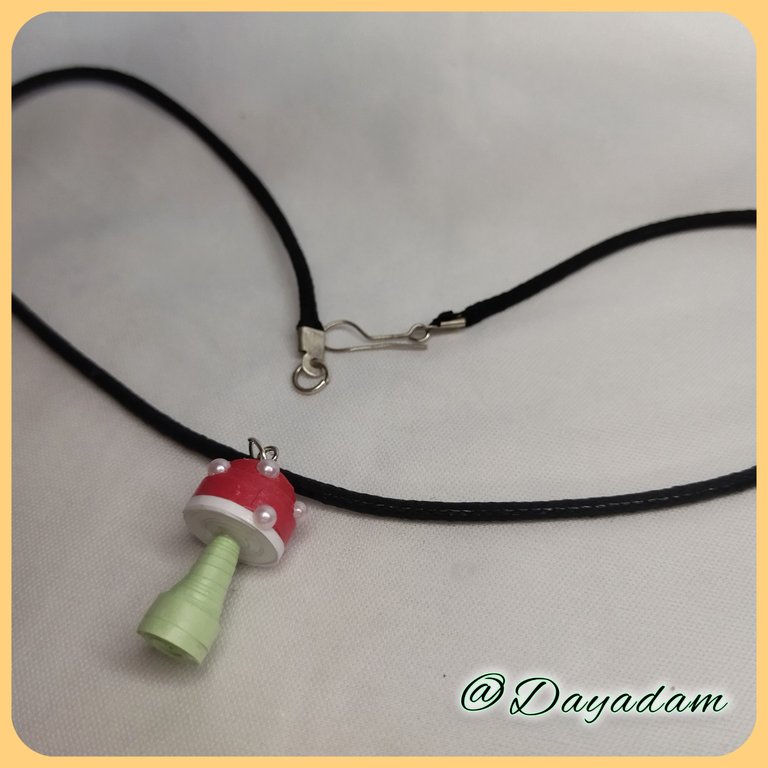
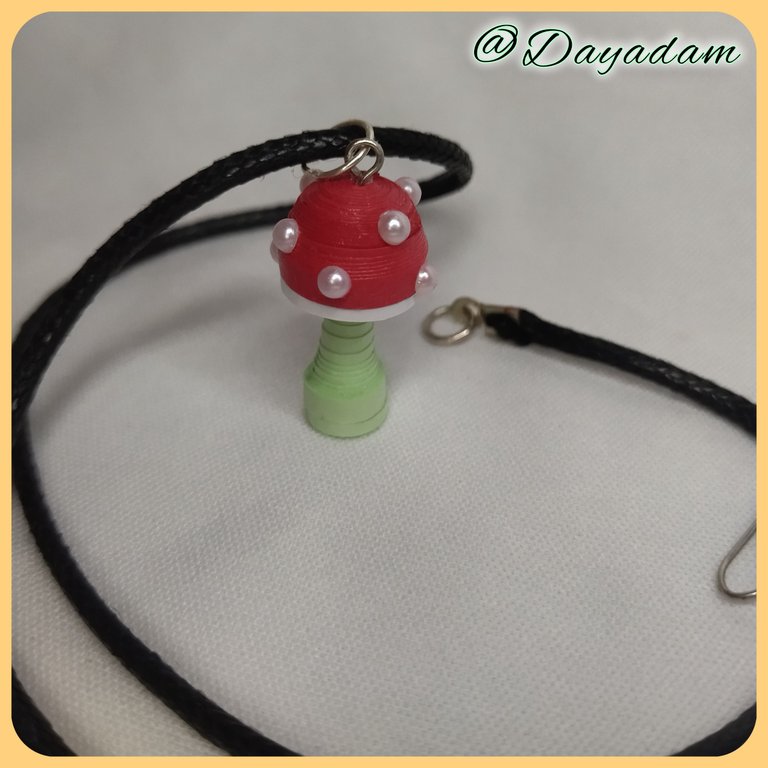
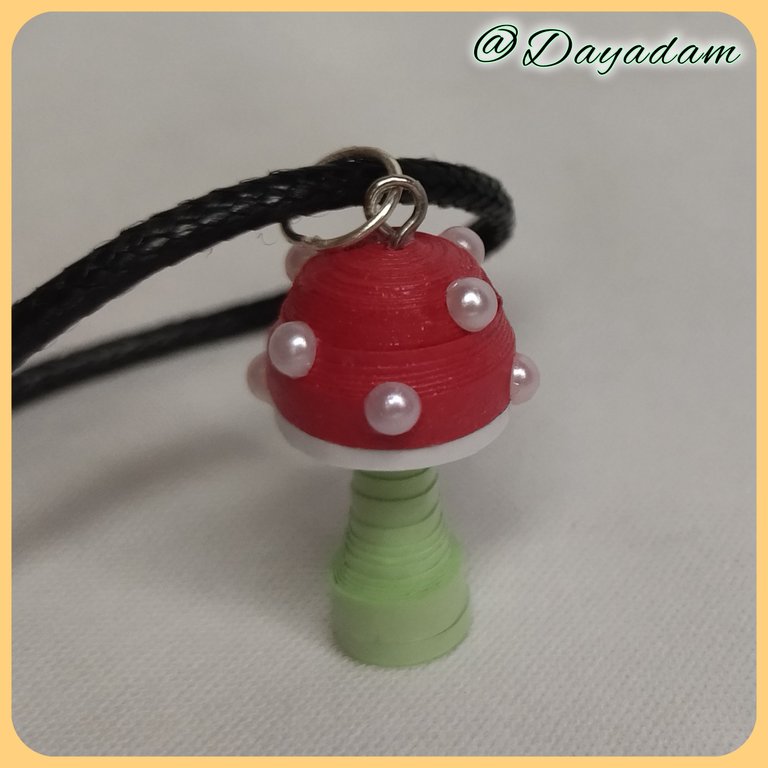
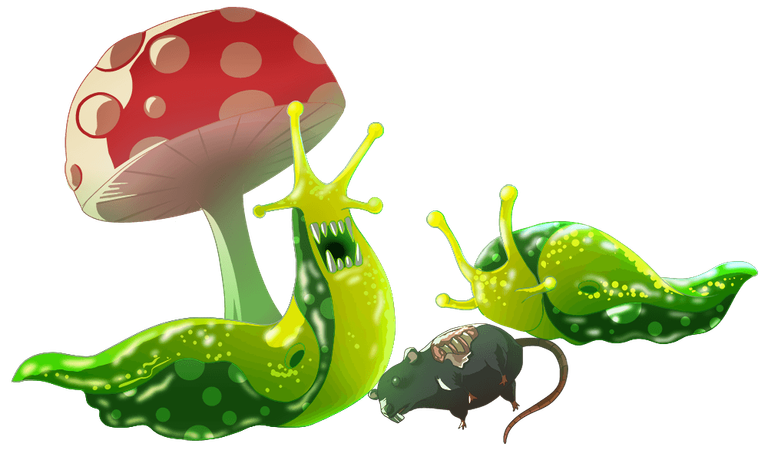
For today I bring you a necklace charm inspired by the letter, Cave Slug, this time I wanted to materialize the element that has the mushroom that accompanies the characters in 3D in the quilling technique.
If you want to know more about the game, I leave you my reference link to enter it and navigate through this wonderful world: https://splinterlands.com?ref=dayadam
Hoping you like my work, without further ado, I leave you with my creative process.
Let's start:😃

Hola a Todos...✨
Hola a mis queridos Hivers y a la querida comunidad de artistas Jewelry, como siempre muy complacida y emocionada de encontrarme por acá nuevamente, mostrándole mi trabajo hecho con mucho amor y especialmente para ustedes.
Un saludo para la comunidad de Splinterlands, y todos los que hacen vida por allí, estoy por acá para unirme al reto Splinterlands Social Media Challenge!.
Para hoy les traigo un dije para collar inspirado en la carta, Cave Slug, en esta oportunidad quise materializar el elemento que posee el hongo que acompaña a los personajes en 3D en la técnica de quilling.
Si quieren saber más con respecto al juego les dejo mi enlace de referencia para que ingresen en él, y naveguen por este maravilloso mundo: https://splinterlands.com?ref=dayadam
Esperando les guste mi trabajo, sin más preámbulos, les dejo mi proceso creativo.
Comencemos:😃

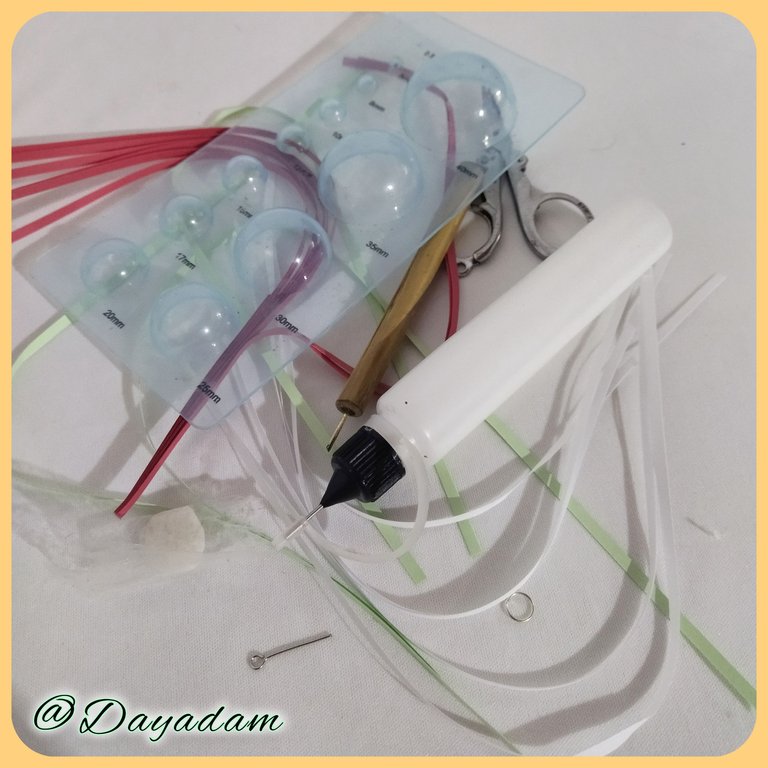
• Cintas de quilling rojas, blancas y verde claro.
• Aguja para quilling.
• Plantilla para moldear círculos.
• Alfiler de bisutería.
• Perlas medias pequeñas de bisutería.
• Pega blanca extra fuerte (de carpintería).
• Tijera.
• Pincel.
• Argolla mediana de bisutería.
• Pinza punta fina.
• Collar de tu preferencia.
- Red, white and light green quilling ribbons.
- Quilling needle.
- Template to mold circles.
- Fashion jewelry pin.
- Small medium-sized costume jewelry beads.
- Extra strong white glue (carpentry glue).
- Scissors.
- Paintbrush.
- Medium size costume jewelry ring.
- Fine tip tweezers.
- Necklace of your choice.

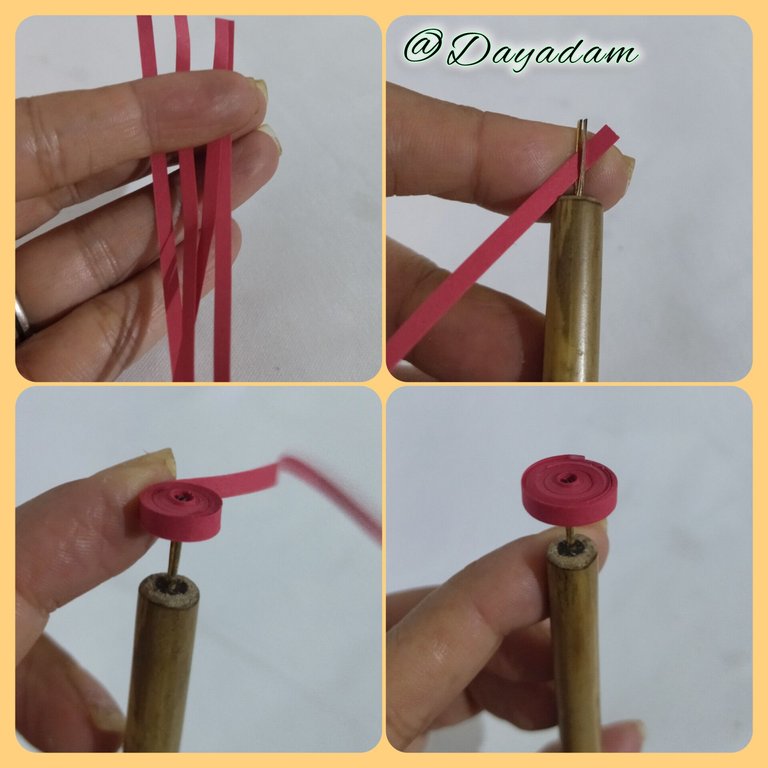
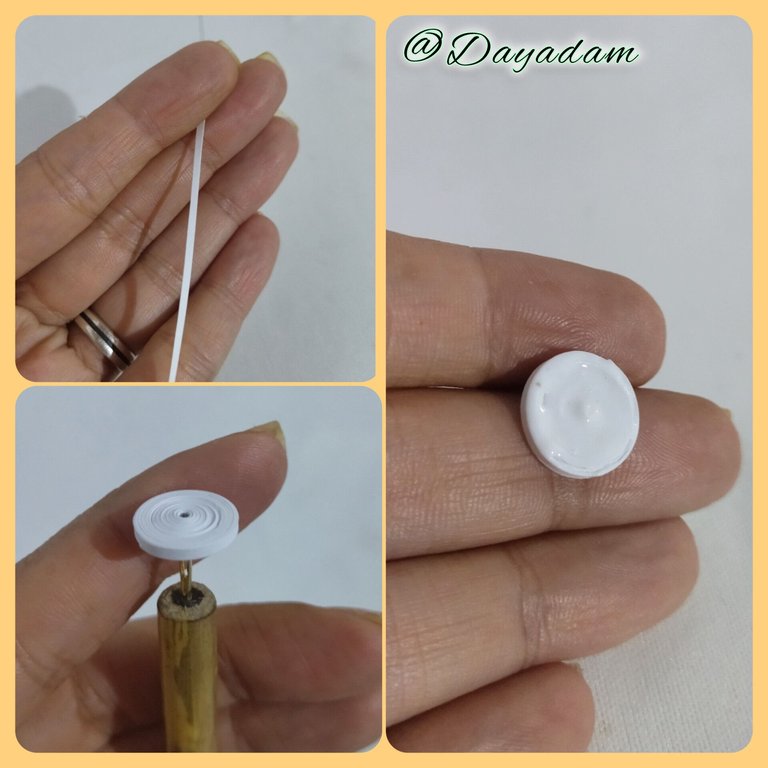
- Let's start by taking quilling tape 3mm wide x 120cms long red color, roll it with the quilling needle until we get a closed circle, take it out of the needle, seal it with extra strong white glue.
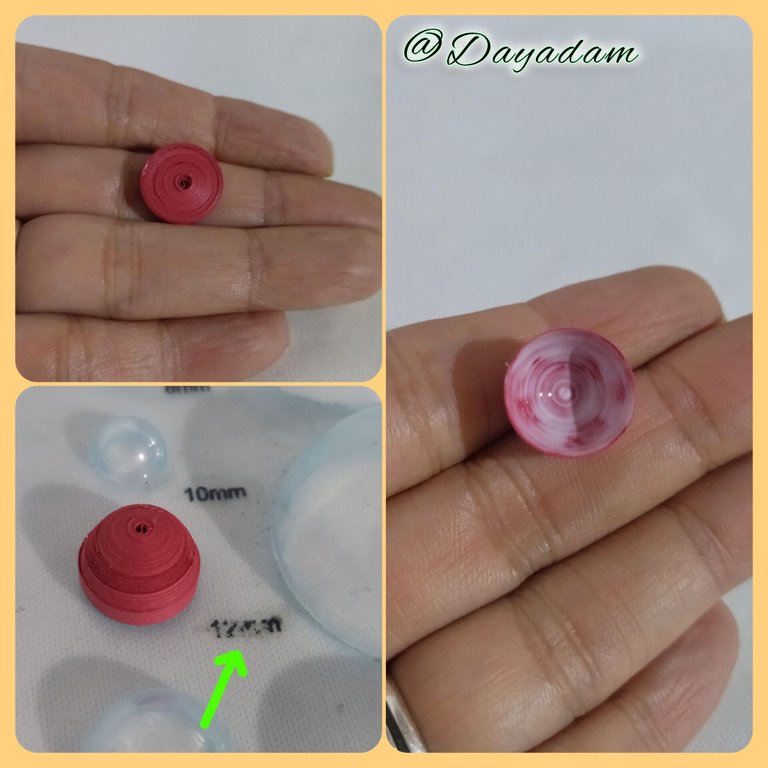
- We are going to mold in the template for circles in the circumference of 12.5mm, apply extra strong white glue on the inside to prevent deformation, let dry.
- With quilling tape 1mm wide x 120cms long we will make a closed circle.
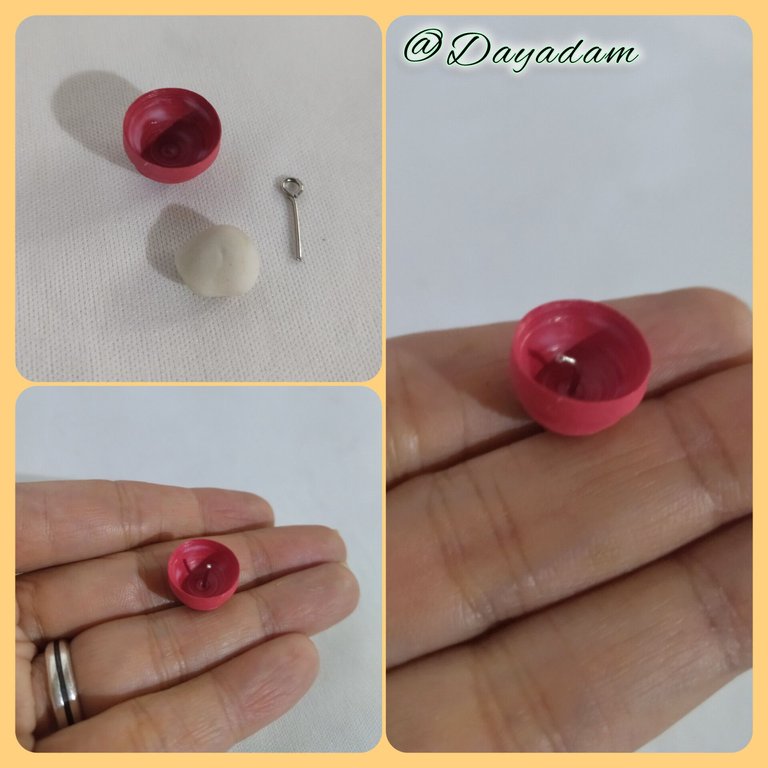
- We take the half circle, which we made previously, a jewelry pin and a piece of flexible dough, these incorporate them in the center of the piece with extra strong white glue, the pin bend it a little with tweezers before placing the flexible dough as you can see in the pictures.
-We will take the circle we made in white color, and we will glue it to the bottom of the red half circle.

• Vamos a comenzar tomando cinta para quilling de 3mm de ancho x 120cms de largo color rojo, enrollamos con la aguja para quilling hasta conseguir un círculo cerrado, sacamos de la aguja, sellamos con pega blanca extra fuerte.
• Vamos a moldear en la plantilla para círculos en la circunferencia de 12,5mm, aplicamos pega blanca extra fuerte por la parte interna para evitar que se deforme, dejamos secar.
• Con cinta para quilling de 1mm de ancho x 120cms de largo haremos un circulo cerrado.
• Tomamos el semi círculo, que hicimos con anterioridad un alfiler de bisutería y un trozo de masa flexible,estos los incorpore en el centro de la pieza con pega blanca extra fuerte, el alfiler lo doble un poco con una pinza antes de colocar la masa flexible tal como pueden ver en la imágenes.
•Tomaremos el circulo que hicimos de color blanco, y lo pegaremos de la parte de abajo del semi circulo rojo.
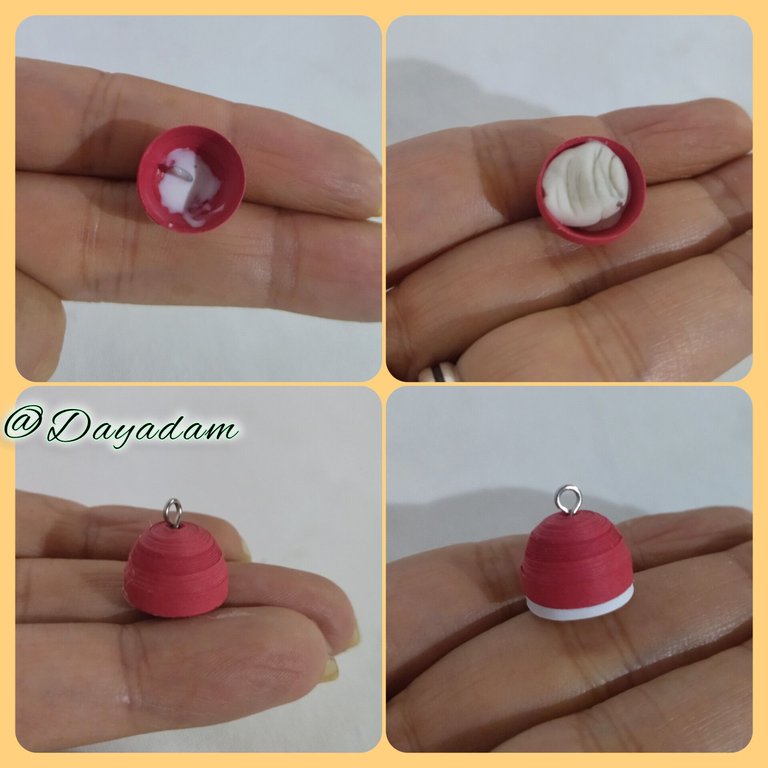
- Now we will take light green quilling tape 3mm wide x 40cms long, we will roll with the quilling needle until we get a closed circle, seal with glue, with a fine brush we will raise the piece as much as we can, we will flatten the top part, we will add extra strong white glue on the inside to prevent the piece from defoy
rming, let it dry very well.
- With 1mm wide green tape we will make a closed circle of the same size as the previous one, we will glue it on the bottom of the mushroom stem, then we will glue the other piece.
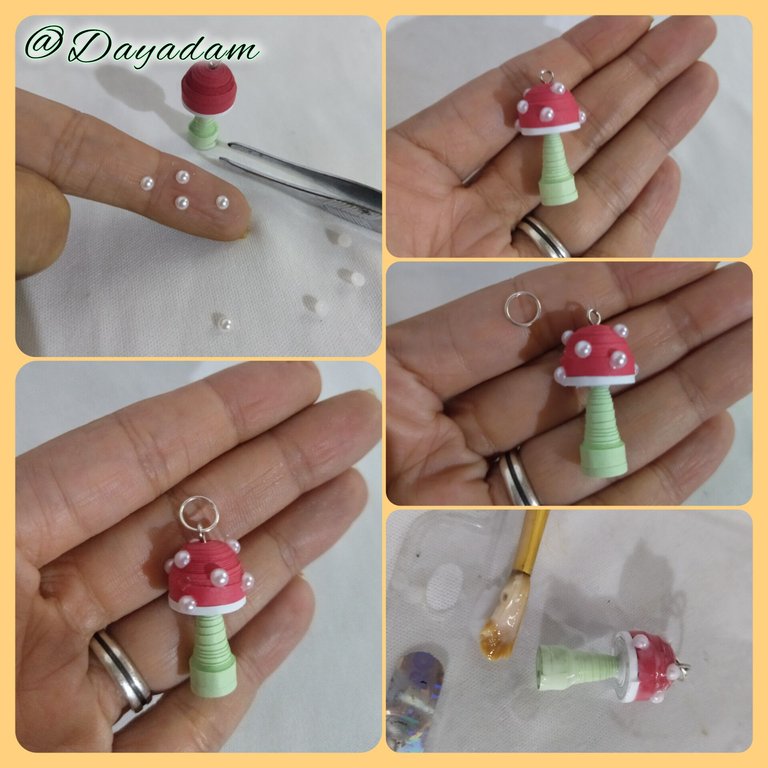
-To decorate place some half pearls on the top of the mushroom, then add a costume jewelry ring to the top of the pin,
- Finally apply several coats of extra strong white glue, letting it dry between coats to give it protection, shine and plasticizing.
- This way we have ready this pendant for necklace that I materialized inspired by the letter "Cave Slug ".
• Ahora tomaremos cinta para quilling color verde claro de 3mm de ancho x 40cms de largo, enrollaremos con la aguja para quilling hasta obtener un círculo cerrado sellamos con pega, con un pincel fino vamos a subir la pieza lo más que podamos, aplanaremos en la parte de arriba, le agregaremos pega blanca extra fuerte por la parte interna para evitar que la pieza se deforme, dejamos secar muy bien.
• Con cinta de 1mm de ancho color verde haremos un circulo cerrado de la misma medida que el anterior, pegaremos en la parte de abajo del tallo del hongo, luego pegaremos de la otra pieza.
•Para decorar coloque algunas medias perlas de la parte de arriba del hongo, luego le incorpore una argolla de bisutería a la parte de arriba del alfiler,
• Por ultimo aplicamos varias capas de pega blanca extra fuerte dejando secar entre una capa y otra para darle, protección, brillo y plastificado.
• De esta manera tenemos listo este dije para collar que materialice inspirado en la carta "Cave Slug".


What did you think, did you like it?
I hope you did, I hope you liked my explanation, procedure and photos, I made them with love for you.
"Let out that muse that inspires you, and let your imagination fly".
Thank you all, see you next time.
¿Que les pareció, les gustó?
Espero que sí, que les haya gustado mi explicación, procedimiento y fotos, los hice con mucho cariño por y para ustedes.
"Deja salir esa musa que te inspira, y deja volar tu imaginación".
Gracias a todos, nos vemos en la próxima.

Thanks for the support @splinterboost ✨
Que cuchi ha quedado este hermoso accesorio amiga, me encanta 💖 😍 ame este honguito, lo que más ne gustó fue la idea de las perlas lo hace ver muy especial, siempre nos sorprendes con tu técnica 🤗😉
!DIY
Gracias hermosa por tu lindo comentario, me alegra muchísimo que te haya gustado. Me decidi a última hora en colocarle esas perlas, lo iba a hacer con quilling pero tome una buena decisión me encantó el resultado final.
Que pases bello día @yolimarag 💕
You can query your personal balance by
!DIYSTATSImpressive results.
Thank you for your words about my work and for the support @djbravo ✨
Most welcome dear.
Hermoso trabajo como siempre 😍
Me encantó que usarás las perlas para los detalles del 🍄 le da un toque diferente y resalta su belleza
Gracias hermosa, la verdad menos mal me decidí por las perlas, ame el resultado final.
Uffff que belleza.. cuando tendré uno para mí?? 😍😍🥺🥺
Ainsssss amigo @fixie tan lindo tu. Te gusta? pues es tuyo, te lo guardaré ese lo tendrás en tus manos ya verás.
Are you looking for Tier 5 brawl guild? THE GUILD OF NEOXIAN looking for brawl players who have good win ratio on brawls. If you are interested then join our Discord & Let our Guild officer
xawiknow that you are interested for guild brawl participation and Also Don't Forgot to Checkout our BDVoter Daily Hive Showcase & Participate into our Daily giveaway to win various prize. Best of Luck 😉Thanks for the support @bdvoter.cur ✨
Estas babosas se ven aterradoras. Pero el colgante está demasiado tierno. Siempre con una técnica tan impecable.
Saludos.
Gracias mi linda por tus palabras. Pera mi es un gusto leer tan bellos comentarios. Saludos y bella noche para ti ✨
El detalle de las perlas le da un toque super especial, como siempre haciendo cosas super lindas🍄
A muchos le gustó y recalcaron lo de las perlas, la verdad que bueno que me decidí por ellas, le dió un plus y me encantó el resultado. Abrazos mi linda @sylregne ✨
Thanks for sharing! - @mango-juice
