Battle Mage Secrets - Lost Legendaries - Fire VS Water

Source: Splinterlands.com
For this week, the Ruleset is "Lost Legendaries." The rules in the Lost Legendaries Ruleset are simple: you cannot use a Legendary Card in your Battle.
After 40 Battles, the Lost Legendary Ruleset finally appeared in my Battle.
Come, join me as I recount the strategy I used in this Battle.

Battle Link
Click Here To Watch The Battle
https://x.com/lodensthoughts/status/1801989789358637522
Battle Rules
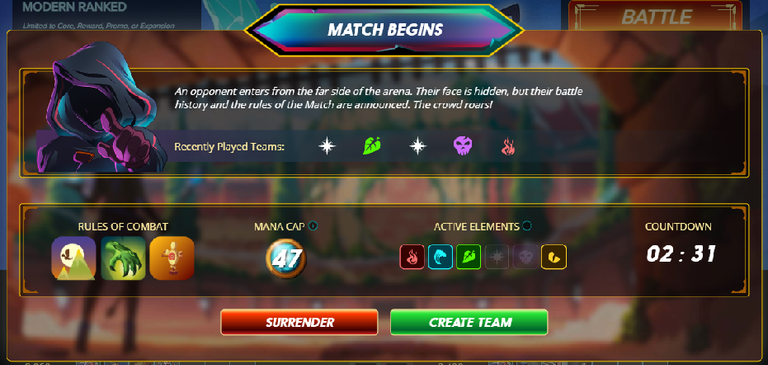
- Mana Cap: 47
- Active Elements: Fire, Water, Earth, and Dragon
- Battle Rules: Lost Legendaries, Maneuvers & Target Practice
To learn more about the Battle Ruleset, check out this link:
Splinterlands Rulesets
My Units
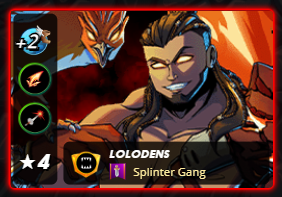
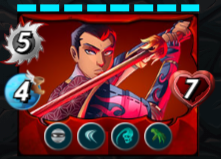
Summoner:
- Conqueror Jacek
- Level 4
- Abilities: +2 Speed, Scattershot & Piercing
I chose Conqueror Jacek because of the buffs he provides. The +2 Speed is a huge advantage in the battle as it allows your units with higher speed to attack first. Piercing is also excellent because even if the enemy has a shield, any excess damage will hit the opponent's health. Scattershot is also great, especially when facing enemies with the camouflage ability.
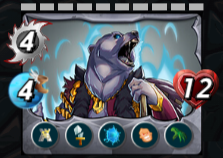
Tank:
- Tusk The Wide
- Level 6
- Abilities: Void and Inspire
I placed Tusk the Wide as my tank anticipating the opponent using Magic Attack units. Besides that, it has a large health pool for only 6 Mana and it has the Inspire ability which increases the melee attack of my units.
2nd Position:
- Arkemis The Bear
- Level 10
- Abilities: Protect, Halving, Forcefield & Enrage
What I love about this unit is its Halving ability, which halves the attack of any enemy it hits. Due to the Maneuver rule, it can attack from the 2nd position. It also has the Protect ability, granting +2 armor to my units without shields. If an enemy has an attack power of 5 or more, it will only deal 1 damage to Arkemis due to its Forcefield ability. Its Enrage ability makes it stronger as its health decreases.
3rd Position:
- Tenyii Striker
- Level 8
- Abilities: Sneak, Dodge & Backfire
This Sneaker has a strong Melee attack and is essential in my lineup. It has a high chance to dodge enemy attacks due to its Dodge ability, and if it succeeds, its Backfire ability will activate, dealing 2 damage to its attacker.

4th Position:
- Uraeus
- Level 6
- Abilities: Sneak & Poison
I love using this Sneaker because it not only Sneaks but also has a high chance to poison the enemy due to its Poison ability. If it poisons the enemy, they will lose health every round.
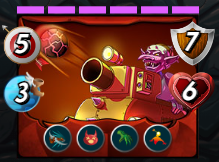
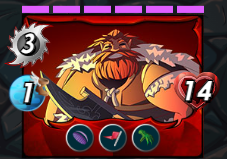
5th Position:
- Lava Launcher
- Level 6
- Abilities: Close Range and Stun
This unit has a strong ranged attack and comes with a Stun ability. I especially like its Close Range ability, which allows it to attack even from the first position.
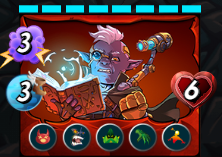
6th Position:
- Technowizologist
- Level 8
- Abilities: Stun, Fury & Camouflage
Although it has low health, this card is safe as long as it isn't in the first position due to its Camouflage ability. If the enemy has a unit with Taunt ability, the damage it receives from this unit will be doubled. Additionally, if they survive the stun from Lava Launcher, they are unlikely to be lucky again as this card also has a Stun ability.
Battle Summary
Round 1:
In the middle of Round 1, my Tenyii Striker immediately defeated his Pelacor Bandit with a powerful Sneak Attack. As expected, my Arkemis the Bear halved the attack of his tank, which was also an Arkemis the Bear.
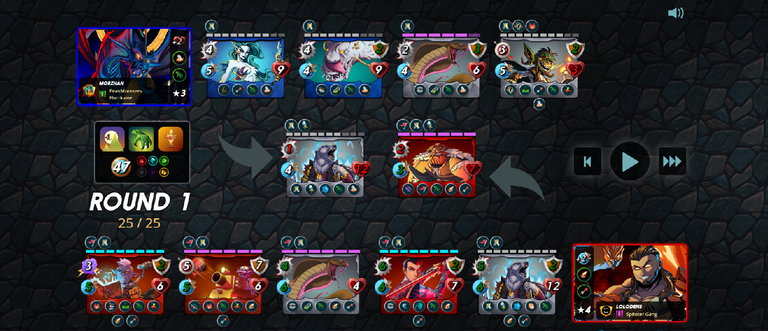
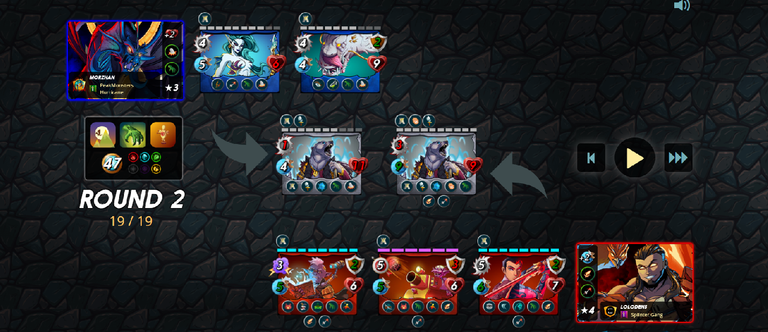
Round 2:
Almost at the beginning of Round 2, his Uraeus was defeated by the consecutive attacks of my Uraeus card and Tenyii Striker. Following that, the enemy's Gobson Bomber was defeated by Technowizologist's scattershot attack. My tank was also defeated by the enemy's Coastal Sentry's double attack, and my Uraeus fell to the enemy's Deeplurker.
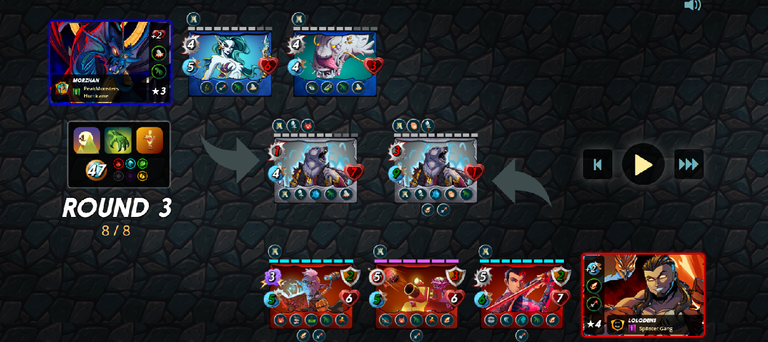
Round 3:
No units were defeated, but my Arkemis the Bear, which moved to the first position, had only 1 health left.
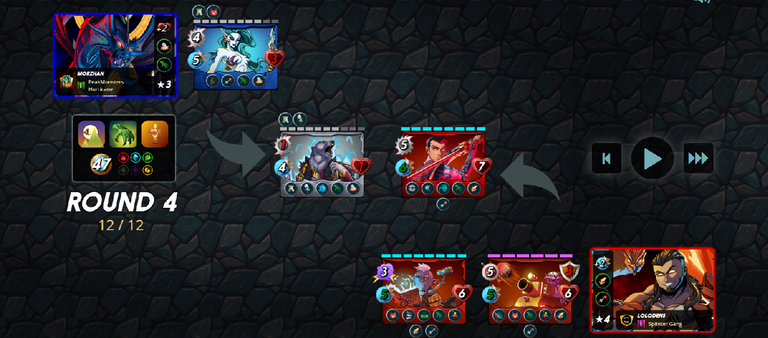
Round 4:
In this round, his Deeplurker was finally defeated, and my Arkemis the Bear tank also fell. His tank was left with just 1 health.
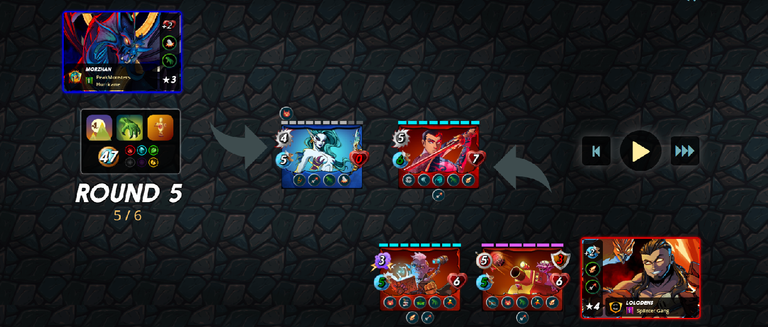
Round 5:
At the start of the round, his tank, which had only 1 health left, was immediately defeated. Only his Coastal Sentry remained, but it didn’t last long as it was defeated by my unit.
Battle Result

Speed is a huge advantage in every battle; fast units attack first and have a higher chance of dodging attacks if they are significantly faster than the enemy units. It's highly advantageous in battle to use Max Level Cards whenever possible, as they have a higher chance of winning.
See you again next week for another Battle Mage Secrets. I hope you liked my strategy in this battle.
!MEME
Credit: pepe-cash
Earn Crypto for your Memes @ HiveMe.me!
Thanks for sharing! - @zallin

Good Work, thanks for sharing!